Last week, I was able to help a local shoemaker friend, who I have a ton to learn from on lots of other parts of shoemaking, to sharpen her first knife to skiving-ready freehand. Great time! Yesterday I got an e-mail from another local shoe friend who wasn’t at the meetup, but who’s having the usual fear, uncertainly, and doubt about sharpening, too.
Here’s an expanded and reorganized version of that e-mail.
Sharpening for New Shoemakers
This short guide sets out a shopping list and how-to for sharpening knives for traditional leather shoemaking. It recommends tools and techniques that are cheap, widely available in United States hardware stores, and used by many successful shoemakers, making and teaching. It’s not the only method, but it’s a method that works. It all costs less than a single fancy sharpening stone.
Unless you happened to buy a specialist knife that came to you unusually sharp out of the box, it’s hard to know what it feels like to cut or skive with a properly maintained blade. Even if you had that new-knife experience, it likely didn’t last long. Leather and rubber are hard on knives, so keeping sharp is something shoemakers do constantly, often without thinking. If you don’t know how to sharpen, and you haven’t built these habits, your knife will make your work coarser, harder, and more dangerous.
If you’ve tried, failed, and got frustrated, welcome to the club. The good news is that sharpening knives is a little like brushing your teeth. The essentials aren’t complicated, the most important thing is doing it regularly, and there are way too many products and gizmos on sale for it. Searching the Internet for how to sharpen knives can feel a lot like deciding what to buy in the toothpaste aisle: overwhelming.
This is one more guide to sharpening on the Internet. But its goal is to get you ready to make shoes for as little money and fuss as possible. Not sell you new or fancy supplies. Not to teach you the ways I find most interesting. The goal here is shoemaking, not sharpening for its own sake. Sharpening is in your way, and we need to get you past it. So you can make shoes.
No Affiliations
I don’t have any paying or other business relationships with the makers or distributors of products I mention in this guide. None of the links pay me sales commissions if you click and buy. I’ve never worked for any knife making, knife sharpening, or knife sharpening supply company.
Scope
This guide will cover sharpening high-carbon steel and common stainless steel knives with flat, straight edges. It will cover knives ground on both sides as well as knives ground on just one side. This includes Barnsley paring knives, flat TINA knives, McKay knives, square-point knives, mill blades, extension blades, many purpose-built skiving knives, and most Japanese and Korean leather knives.
The very same supplies can be used to sharpen knives with curved edges, like chef knives, or knives where the edge bends from side to side, like curved TINA knives, but with slightly different, swooping hand motions. I won’t cover those here, and I would recommend learning to sharpen flat and straight edges first.
Unfortunately, you will need a sharpening rod and dowel strop to sharpen convex edges like curved lip knives. Flat stones and strops can’t reach well into curves.
I haven’t seen leather knives using so-called “super steels” or ceramic blades yet, but they are probably coming. Those require much harder abrasives to sharpen, like diamond plates, stones, and emulsions. Even if they become more common, I expect cheaper high-carbon steel and stainless steel blades to remain more popular in shoemaking, just as they do in cooking. For hard working, long working blades that have to stay razor sharp, sharpenability and sharpness are practically the same. At least from what I’ve seen so far, the super-ness of super steels and ceramics don’t extend to keeping skiving-ready edges without maintenance for long enough to make sharpening optional.
Side Note: Disposable blades are fine.
I own too many knives. I own too many sharpening supplies. I’ve got the acquisitive disease, and I’ve got it bad. But I am also here to tell you that if you’re already making shoes with disposable blades, or want to try disposables and put off learning sharpening, that is completely fine. Go make shoes. I will not look down on you. If anybody else does, we can look down on them together.
Not just beginners but also some very fine bespoke makers cut and skive with disposable blades. So do a bunch of really skilled repairers. If you want to try that, I recommend Stanley-style, trapezoidal utility blades for cutting and OLFA-style, 18 millimeter wide, 30-degree, snap-off blades for skiving. Brands are not important. If you already have one or both kinds of knives, use them.
Change your blades a lot. Buy at least a hundred Stanley-style blades and ten snap-off blades. Flip, change, or snap-off your blade before every major cutting task, and maybe several times while skiving.
You might go through a dozen blades or more to make a pair. So what? Today, in early March of 2025, Stanley-style blades on Amazon cost ten cents apiece in packs of one hundred, with two cutting ends per blade. OLFA blades cost less than a dollar each, with eight snap-off stages. Ten fresh Stanley-blade edges cost fifty cents. Ten fresh OLFA-blade edges cost a little over one dollar. You might spend more on the eyelets or heel lifts for a pair.
There is one safety concern you should keep in mind when skiving with snap-off blades: never bend the blade so much that it snaps off on its own. If you tend to hold your face close to the work as you skive, strongly consider safety glasses. Protect your eyes.
Supplies
Sharpening Stone
Find a sharpening stone with two sides, coarse and fine. Here is one from ACE Hardware, listed at $5.50 as I write:
https://www.acehardware.com/departments/tools/hand-tools/sharpening-tools/21160
Aluminum oxide stones are fine. Also very affordable.
Six inches is a good length. You don’t need a really long stone. Longer ones tend to cost a lot more money.
Two inches is a fine width. As long as you can lay the longest straight blade edge you have across at a 45-degree angle without going over, you can sharpen your edges all at once, without working in sections.
Light Oil
Find a bottle of light oil to wipe onto the stone before you sharpen and wipe off when you’re done. This will remove the little bits of metal that you grind off your knives, or “swarf”, so they don’t clog up the surface of your stone.
3-in-1 oil is fine. Other light bicycle chain oil is fine. Most ACE Hardware stores I’ve been to stock some “sharpening oil” or “honing oil” next to the sharpening stones. Buy that if you like.
https://3inone.com/product/3-in-one-multi-purpose-oil/
https://www.amazon.com/dp/B0002JN5PG/
https://www.amazon.com/dp/B000I1AVDW/
Don’t use cooking oils, which tend to run thick and go rancid. Don’t use drying oils like linseed, flax, walnut, castor, or other wood finishing oils. You want the oil to say liquid so you can wipe it off, not harden into a coating.
Alcohol-Based Marker
Sharpie or similar. You will use this to mark on your blades, at least starting out.
https://www.sharpie.com/markers/permanent-markers/
Towel or Rag
You’ll need something to wipe the oil off your stone.
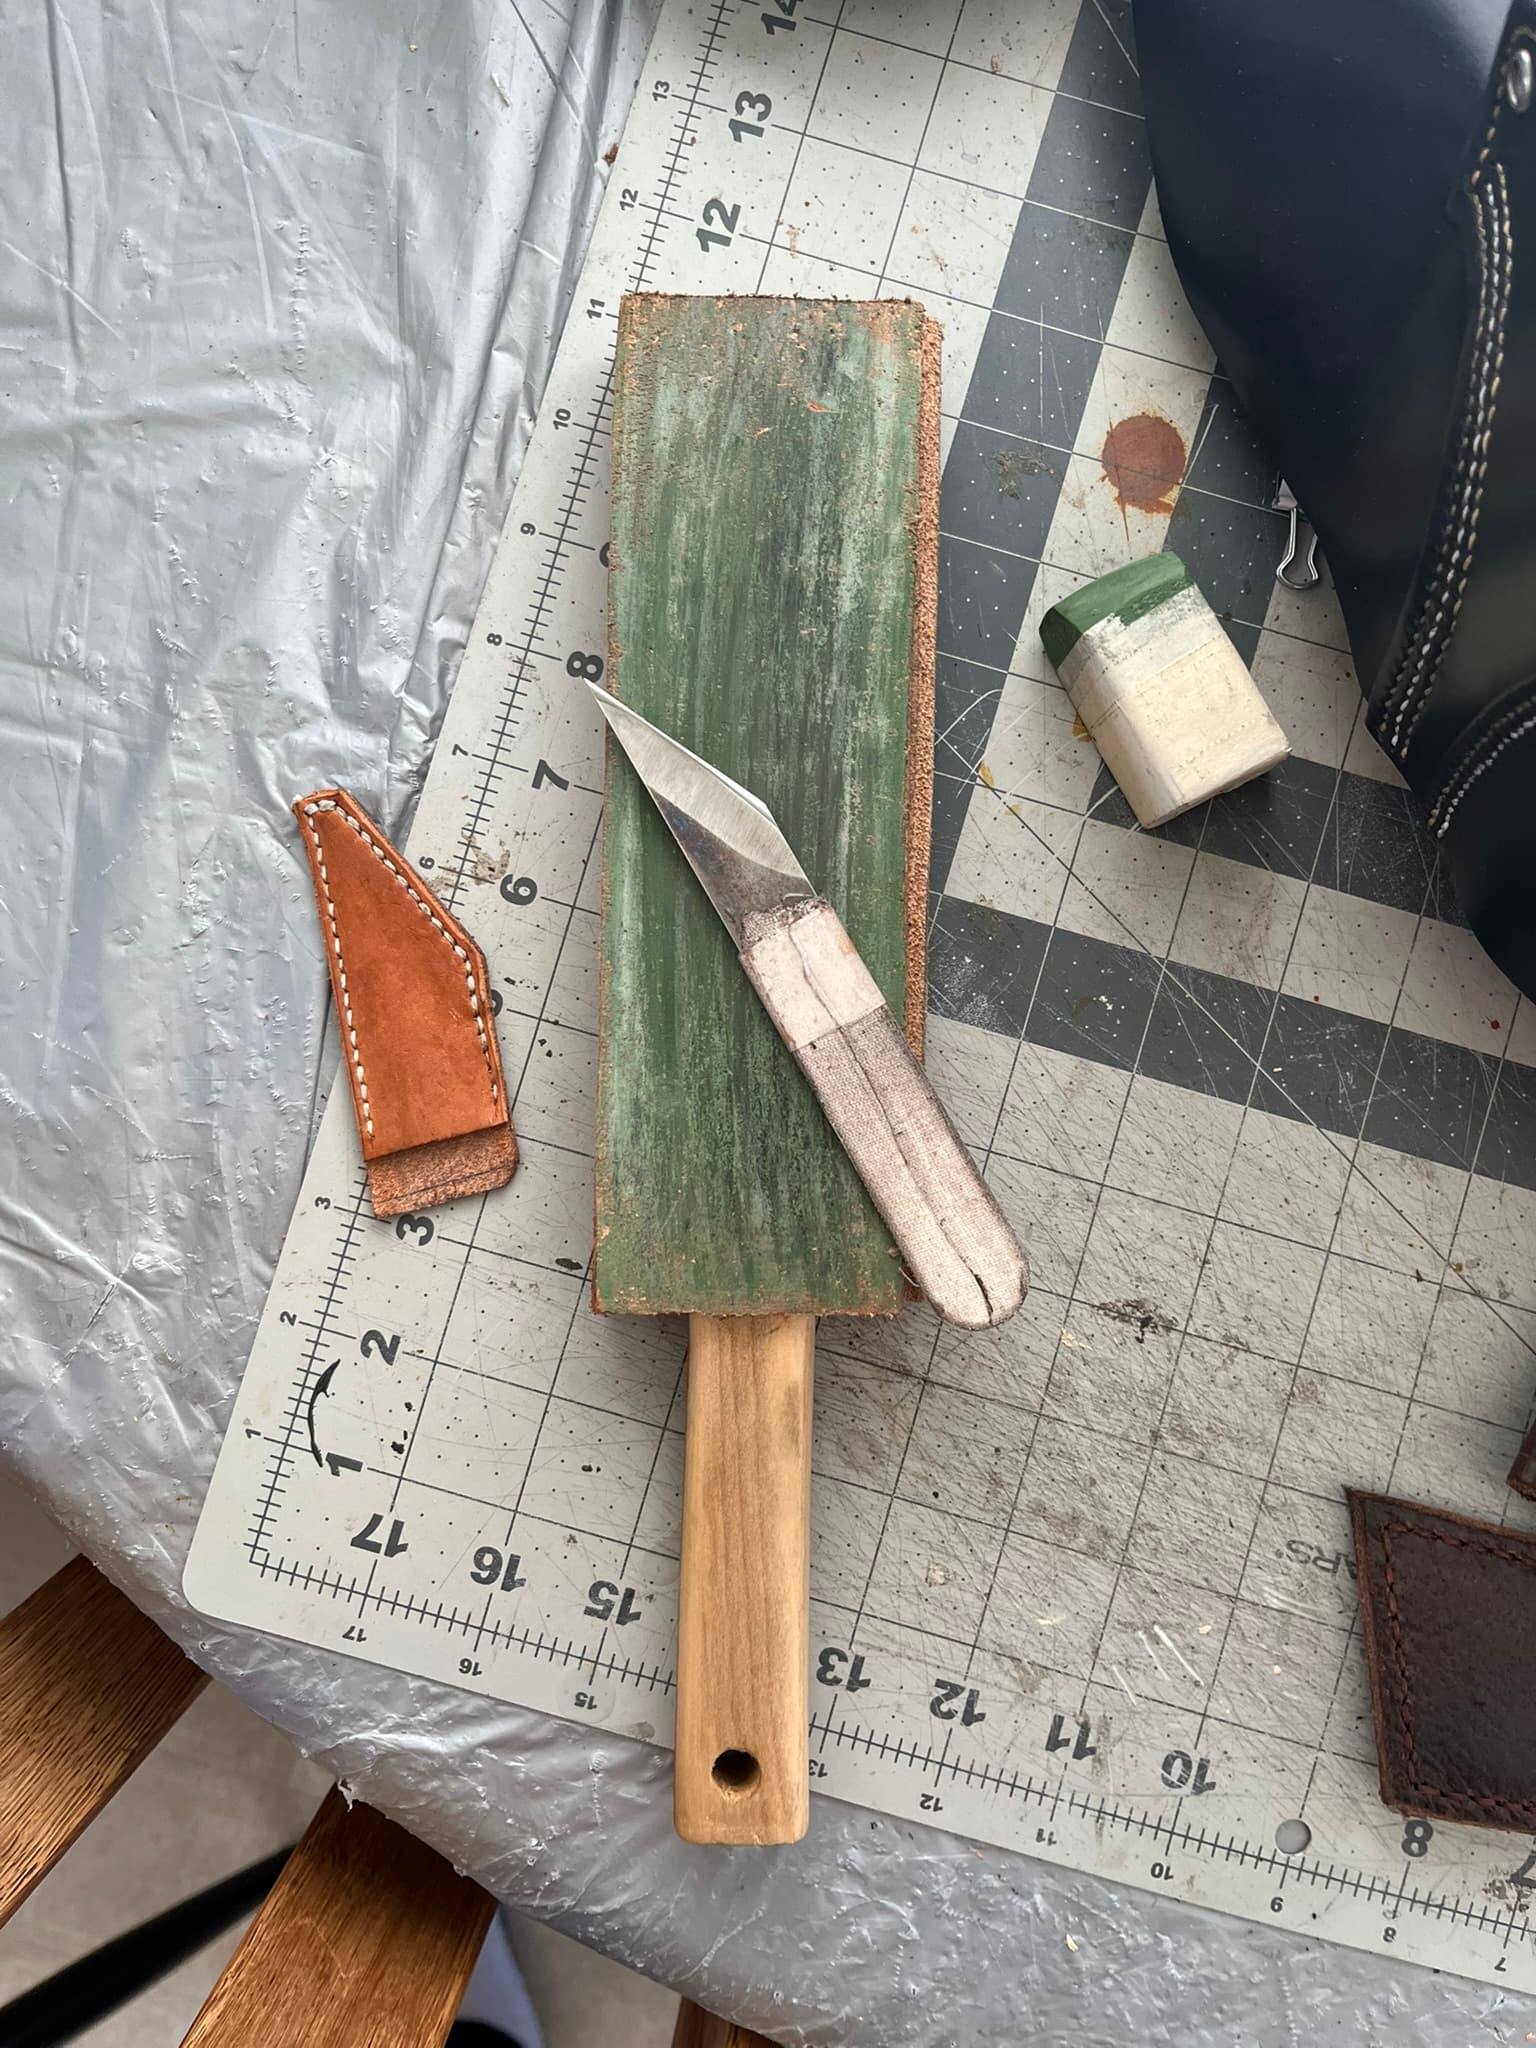
Paddle Stop
This is just a wood board narrowed to a handle at one end with a strip of leather glued on the flat part. You can absolutely make one yourself from wood and scrap veg-tan leather. Or you can buy one online.
This kit is almost exactly the size I prefer, and also comes with other supplies discussed below:
There’s nothing magical about this brand or model.
I prefer a strop with a leather surface 2½ to 3 inches wide and 8 or so inches long and a handle at least 3 inches long. Exact dimensions aren’t important. Like with sharpening stones, you want to be able to lay your whole cutting edge across, perhaps at a 45-degree angle. Stropping motions are faster and looser than sharpening motions, so it’s nice to have a bit more length and width than for a stone.
If you have or can more easily make a strop without a handle, just cementing a rectangle of leather so some flat, stiff, surface, that’s fine. I personally appreciate having a handle so I can grab my strop, bring it toward my body, hold it in different positions, use it standing up, and so on. But many great shoemakers do all their stropping on little patches of leather glued to simple blocks of wood they slide over their benches.
Don’t pay for or build a much longer strop, thinking longer must be better. You will probably end up keeping your strop on your workbench, so handiness is important. If you already have a long paddle strop, use what you have. Consider chopping it down later, if you like.
You won’t need multiple leather surfaces, either, though it’s fine to buy a strop with leather on both sides. I personally prefer to use the flesh side of the leather, rather than the grain side, but either is fine. If you’re making your own strop and need to choose, I would recommend cementing with the flesh side up, unless the flesh side of your leather is very stringy, ragged, and uneven. Then use the gain side.
Buffing Compound
Buy a small cake or stick of green chromium oxide buffing compound. My local ACE Hardware carries these, though they aren’t listed on the website at the moment:
https://dicoproducts.com/products.php?pid=7100970&gid=2&cid=32&sgid=17
Again, brand is not important:
You don’t need a big tube or huge bar of this. Those are for people running motorized buffing wheels. I’m still using the first six-inch bar of compound I bought more than a decade ago.
You don’t need multiple kinds or colors or grits of compound, either. Just the green chromium oxide will do.
Online stores carrying buffing compound may try to upsell you diamond-based pastes or emulsions. Those are good products, and can work better on expensive “super steels” in fancy knives that cost hundreds of dollars. But they’re not necessary for any common shoe or leather working knives, and the good ones cost more than all the supplies I recommend combined. The cheap ones are bad knock-offs.
Preparation
Take your buffing compound in your hand like a crayon and color it onto the leather surface of your paddle strop. You should see some green everywhere, all over the surface of the leather, but you don’t have to cover the leather completely by rubbing a lot, really hard, melting the compound with a heat gun, or anything like that. It’s perfectly fine to see fibers of leather poking through. Starting out, your strop should look like a heather-green t-shirt:
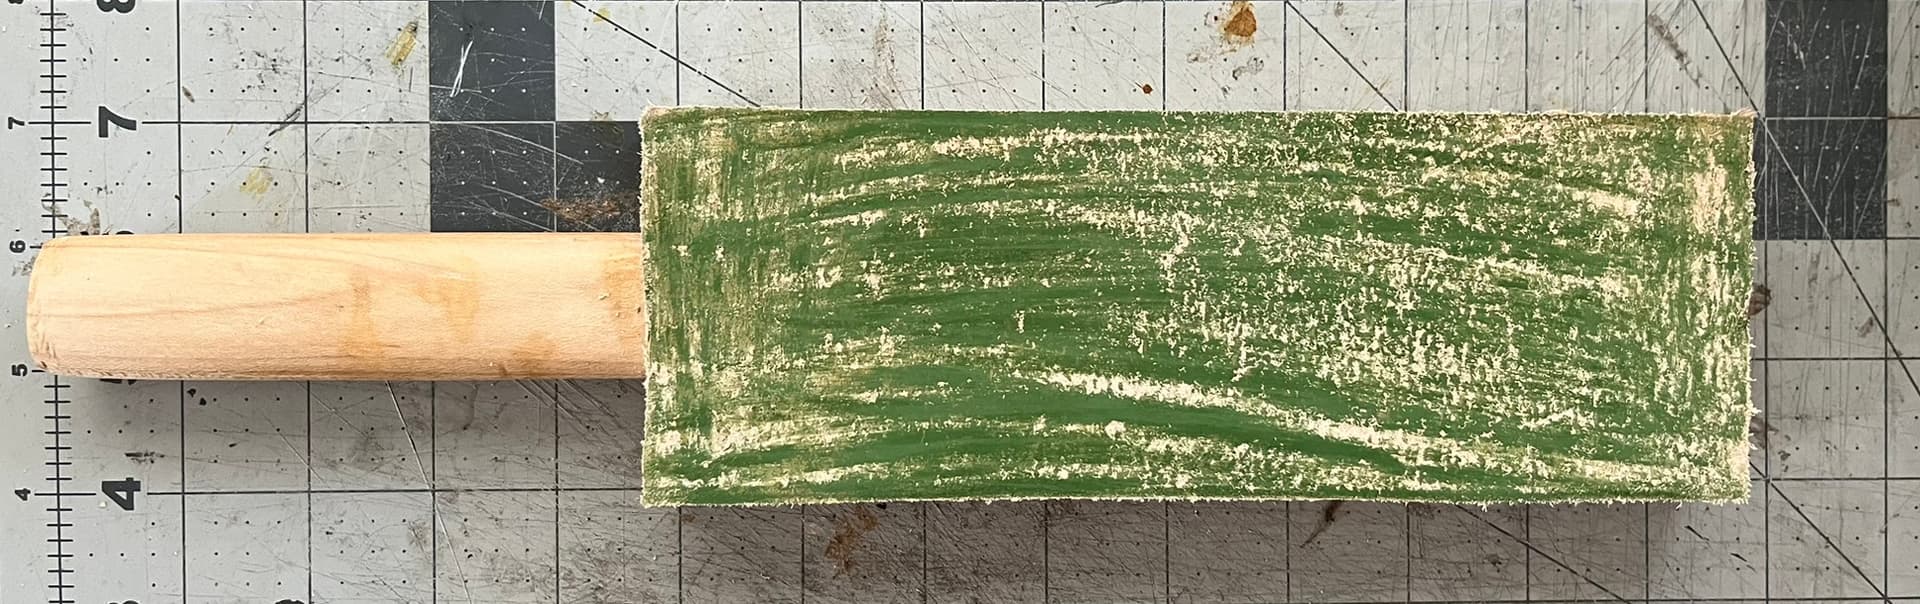
I frankly overdid it a bit near the handle on this strop. The coverage toward the right hand of the photo is best.
The Process
Steps
The steps are straightening, apexing, and stropping, in that order.
You’ll straighten your knives on the coarse side of your stone. That side grinds away a lot of material quickly, which makes it ideal for grinding away an old edge with nicks, chips, or other damage, to make a new, clean, straight edge a bit further back on the blade. When your knife is just dull, not damaged, you’ll skip this step.
You’ll apex your knives on the coarse and fine sides of your stone. The fine side grinds away material more slowly, but leaves a smoother surface. Rather than making a whole new edge without damage, apexing flattens the slopes on one or both sides of the edge, called “bevels”, so they come to a neat, wedge-like point or “apex” along the edge.
You’ll strop your knives on the buffing compound you crayoned onto your paddle strop. Stropping reduces burrs—more on those later—so the edge bites in cleanly. It also polishes the sides or bevels of your knife, so it glides through with little resistance once bit in. The compound also works like a very fine sharpening stone, doing just a little bit of sharpening every time you use it.
Once you’ve sharpened a knife properly, you will only rarely have to straighten it. You will only have to apex every once in a while. You’ll be stropping pretty much constantly.
Straightening

If your knife has chips or gouges out of its edge, start with the coarse side of the stone facing up. Otherwise skip right to apexing, below.
Put the stone on a flat bench surface where it won’t slide around. Drip some light oil on the stone and spread it around with a finger so it coats the whole surface of the stone. You don’t need a puddle of oil, just enough to catch the grains of steel that you grind away, so you can wipe them off with the oil later.
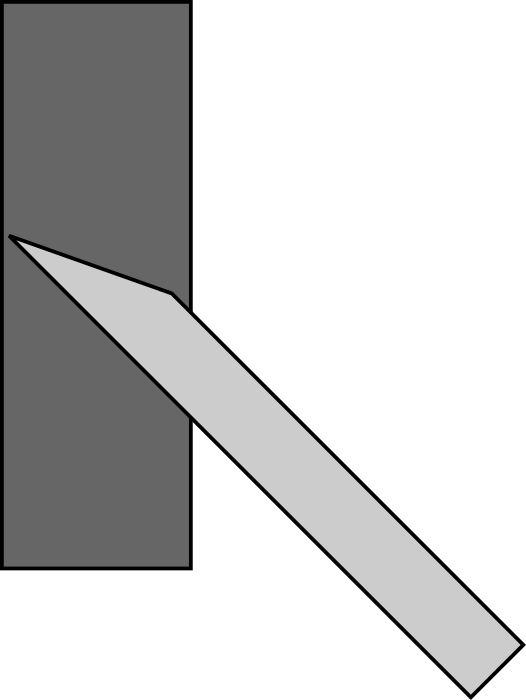
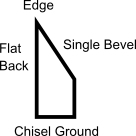
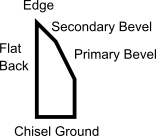
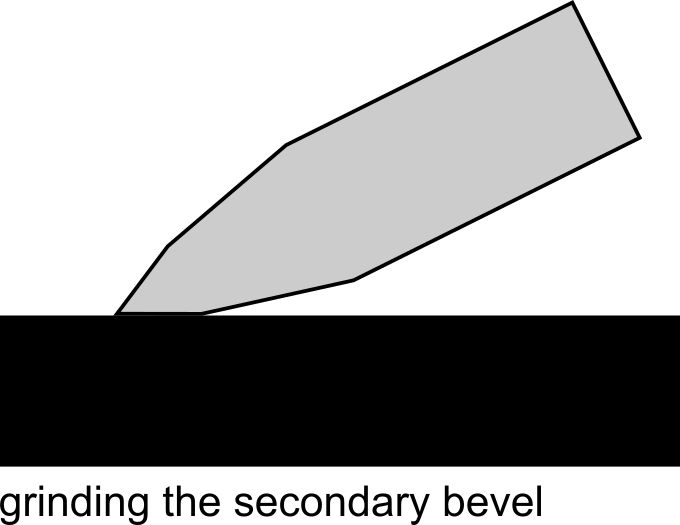
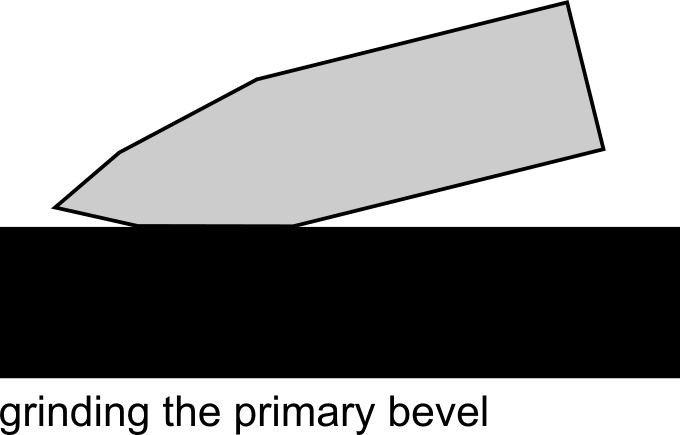
Take a look at one side of your knife. Look for lines or ridges in the metal that show where it has been ground down, or beveled, to make sloped surfaces angled toward the edge. Each side of your knife may be completely flat, like the back of a chisel, have one bevel, or have two distinct bevels, a “primary bevel” that starts closer to the spine and a narrower “secondary bevel” running right up to the edge.

Pick a side of your blade that isn’t flat and color the bevel right along the edge of one side of the blade with your marker. Then lay the blade on the stone so it lays flat on the bevel you just colored. Push and pull the blade back and forth across the stone lengthwise, holding it down to the face of the stone at that angle as steadily as you can.
We all tend to raise the handle of the blade as we pull it close to our body and lower the handle as we push away. Try not to do this. It will probably help to think about holding your hands and arms still and moving your body instead. For just this reason, many prefer to sharpen standing, not sitting, but both are possible.
There’s no need to push the blade down into the stone with any pressure. Just hold it to the stone so you can feel and hear it rubbing against the grit as you push and pull.
After ten or so passes back and forth, take your knife off the stone. The ink on the primary bevel should be worn away. If it’s not, you need to change the angle you’re holding, either up or down, so to the surface of the stone rubs the bevel of the knife where the ink is. Draw more ink onto the blade and try again.
Getting this angle right and holding it is the first hand skill in sharpening. Almost nobody gets it right the very first time, but everybody gets it eventually, as long as they don’t give up. Keep inking the bevel with your marker and trying slightly different angles until you grind it all away. If you get frustrated, take a break. Once you get it, it will seem easy, like pedaling a bicycle.
It’s important to hold an angle that grinds the bevel near the edge. But the angle doesn’t have to be precise down to the degree, and there’s no need for an angle guide or jig to hold your knives. As long as you’re grinding right up to the edge, you’ve got it.
A lot of people I’ve taught tended to hold the handle of the knife too low to the stone to start, creating an angle between the blade and the stone that’s too narrow, or acute. They might grind away ink drawn further from the edge, but not the ink right next to the edge. Getting the right angle took raising the back of the knife a little higher. To sharpen a dull knife, you have to grind right up to the edge.
When you’ve successfully rubbed all the ink off the primary bevel on one side, flip the knife over. If your knife has a bevel on the other side, repeat the process on the primary bevel on that side. If your knife is completely flat on the back side, like a chisel, lay the last centimeter or so of the back side on the edge of your stone, with the rest hanging off the side, and pull the blade straight off the stone. Just once is enough.
Repeat this process on each side of your knife until you’ve ground away the old edge with the chips, dings, and other damage and made a new, straight, clean edge behind it.
If you’re thinking this will make your knife just a tiny bit narrower, edge to spine, you’re right. That’s normal, and knife blades are made as they are so you can do this. Professional knife users who ding and dull knives a lot, like butchers, often use knives for many years, sharpening hundreds or thousands of times. Big, wide butcher knives become slimmer fillet knives become steak knives become paring knives. Knife companies selling those smaller knives factory-made is a relatively recent development, for convenience.
Some shoemakers take pride in how they’ve sharpened their knives down over time. Popular knives like those from TINA and Barnsley start out very long, but can end up too small to hold onto.
Buying too many knives is a communicable brain disorder. Appreciating well used tools and experienced operators is somewhere on the path to wisdom.
Apexing
Now you’re ready to start making your knife sharp.

If you’ve just straightened your knife, apex it on the coarse side of your stone first, then repeat on the fine side. Otherwise, skip right to the fine side.
The grinding motion for apexing is the same as for straightening, but our goal is not making a new, straight edge but flattening the sides of the blade leading up to that edge. Since our goal is different, we use a different sign to tell us when to switch sides.
Lay your knife on a bevel running right up to the edge and push and pull back and forth across the stone lengthwise. Use your marker to check your angle if you feel you need to.
After each set of ten passes or so, stop, pick up the blade and run the pad of your forefinger across, not along, the edge on the opposite side from the one you ground. Start with your finger on the blade and push it off the edge into the air. Feel for a “burr”, or thin lip of metal folded over the edge of the knife. This is the second hand skill in sharpening.
A burr will feel like a hard hair or wire running along the edge. You won’t be able to feel it on the side of the knife you were sharpening, because it’s folded over to the opposite side. If you’ve ever used a metal scraper to finish wood, this is the same kind of burr.
If your knife is ground on both sides, once you feel a burr along the whole length of the edge, flip the knife over and grind the other side in sets of ten passes until you feel another burr on the opposite side. If your knife has one flat side, like a chisel, lay the last centimeter or so of the back side on the edge of your stop, with the rest hanging off the side, and pull the blade straight off the stone. Once is enough, just like when straightening. After you’ve done this, you should no longer feel a burr on the flat side of the blade.
Once you’ve raised burrs on both sides of your blade, if you’re on the coarse side of your stone, repeat on the fine side. You’ll probably notice that burrs from the fine side feel smaller than those from the coarse side.
Once you’ve raised burrs on both sides of your knife on the fine side, you’re done. Wipe the oil off your stone. You might see flecks of black steel on the cloth when you do.
Your knife should look and feel sharp to the touch at this point, like when it was new. But it probably won’t be skiving sharp. For that, move on to stropping.
Stropping
Hold the blade of your knife to the face of your strop at the same angle that you used for apexing on your stone. Drag the edge over the compound, pulling the knife backwards, spine leading the edge.
Don’t push the other way, with the edge leading the spine, as if you were shaving or cutting into the leather. Only drag it backwards.
There’s no need to push the blade down into the strop, either. As long as the metal is rubbing over the compound, it will work.
If your knife has bevels ground on both sides, alternate sides: one stroke on one side then one stroke on the other make one complete pass.
If your knife is only ground on one side, like a chisel, just stroke the beveled side. When you’re done, lay the last centimeter or so of the back side on the edge of your strop, with the rest hanging off the side, and pull the blade straight off the strop. Once is enough, just like when straightening or apexing.
The stropping motion is the third hand skill in sharpening. You may see other shoemakers do it very quickly, but don’t ever rush. That will only lead you toward changing the angle or using too much pressure. As you practice, you’ll naturally get faster, without trying or thinking about it, especially if you keep your mind and body relaxed. However, it is true that squishiness of the leather will let you strop a little less precisely, and maybe a little harder, than you sharpen. In time this can make the bevels of your knives a bit rounded, rather than straight. Apexing will flatten them again.
For a freshly apexed knife, twenty passes will do the job completely. When using your knife later, just a few passes will do. Ten will be a lot.
Maintenance
Always be stropping.
You may have noticed that many shoemakers seem to strop, steel, or stone their knives pretty much every time they pick them up, almost automatically, often without really looking at what they’re doing. During delicate jobs like skiving, they might doing it before each and every cut.
You may have seen chefs at fancy restaurants or on TV do the same with their kitchen knives, swishing them side to side against a knife steel. It’s all for the same purpose. If you want to cut an onion without crying, or slice tomato so thin you can see through it, always be steeling. If you want to skive smoothly, carve clean holdfasts, or block soles in long, sweeping cuts, always be stropping.
There’s nothing wrong with using a kitchen-style knife steel or hand stone in shoemaking, either. Those are all older methods from back before buffing compounds were cheap and readily available. I’ve recommended a paddle strop with compound because they’re easy to make, cheap, come in handier sizes, in many cases work better, and also have a long lineage in shoemaking, where they’ve also been known as “buff sticks”, “rap sticks”, “sharpening bats”, and a bunch of other names. They’re the best, cheapest, easiest option I know.
The downside of compound on strops is that the compound will wear out and also collect bits of metal, or swarf, taken off your knives. While we can use oil to clean swarf off aluminum oxide stones, we don’t want a bunch of oil diluting the compound on our strops.
When the compound on your strop becomes more gray or black than green, crayon on some more compound. When the compound cakes up to the point that the surface becomes bumpy or uneven, scrape the compound off with the spine of a knife or a disposable razor blade until you see grains of leather sticking through again. You don’t have to remove all the compound. Think heather-green t-shirt again. Crayon on more compound and start the cycle over again.
My strop after many, many rounds of shape tweaks, leather replacements, and layers of different compounds, one of which is on the right. Yours will be less green, with more tan leather showing through and no black swarf starting out.
Aluminum oxide sharpening stones also wear over time. If you notice the surface getting filled in with swarf or oil, wash with dish soap in your kitchen sink and brush with a stiff brush to clean it out. It doesn’t need to look clean. It just needs to feel rough and cut steel again.
Over time, you may also notice the surfaces of your stone becoming concave or “dished out”. This comes from our natural tendency to to lift and drop our blades as we push them back and forth. You can flatten your stone’s faces by rubbing against a harder, flatten surface. You can also work to flatten your stones by working more over the high spots or turning the stone around 180 degrees. Of course, you can also just buy a new stone, saving the old one for rougher jobs or smaller blades, like pocket knives or scissors.
Reprofiling
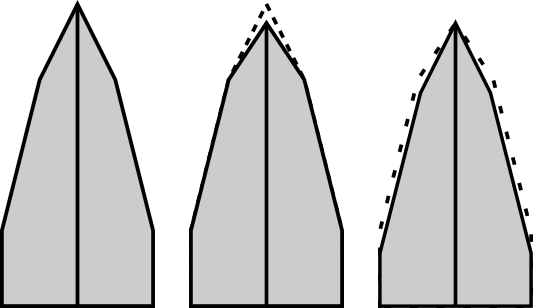
Long-term, sharpening the secondary bevels of your knives will bring the edges of knives further and further back toward the line where the secondary bevel starts. That will make the edges of your knives wider, or more oblique, in shape. Wider angles typically make knives tougher, but less good at slicing. Meat cleavers have wider angles. Sushi knives have narrow ones.
After many straightenings, you may want to reprofile your knife so the bevels run at angles more like they did when the knife was new. You can do this by grinding the primary and secondary bevels of your knives against the coarse side of your sharpening stone, removing material where the bevels start, toward the spine of the blade rather than the edge, until the reach the angle you want.
Even some professional shoemakers leave this to professional knife sharpeners with power tools. Pros who do it themselves may only do so once a year, or even less often.
When you’ve made as many shoes as it takes to put a knife in need of reprofiling, remember back to when you were first starting, reading this little guide, and have a laugh. You’ll be well on your way!
Go make shoes!