Slotted Lap Board for Boots

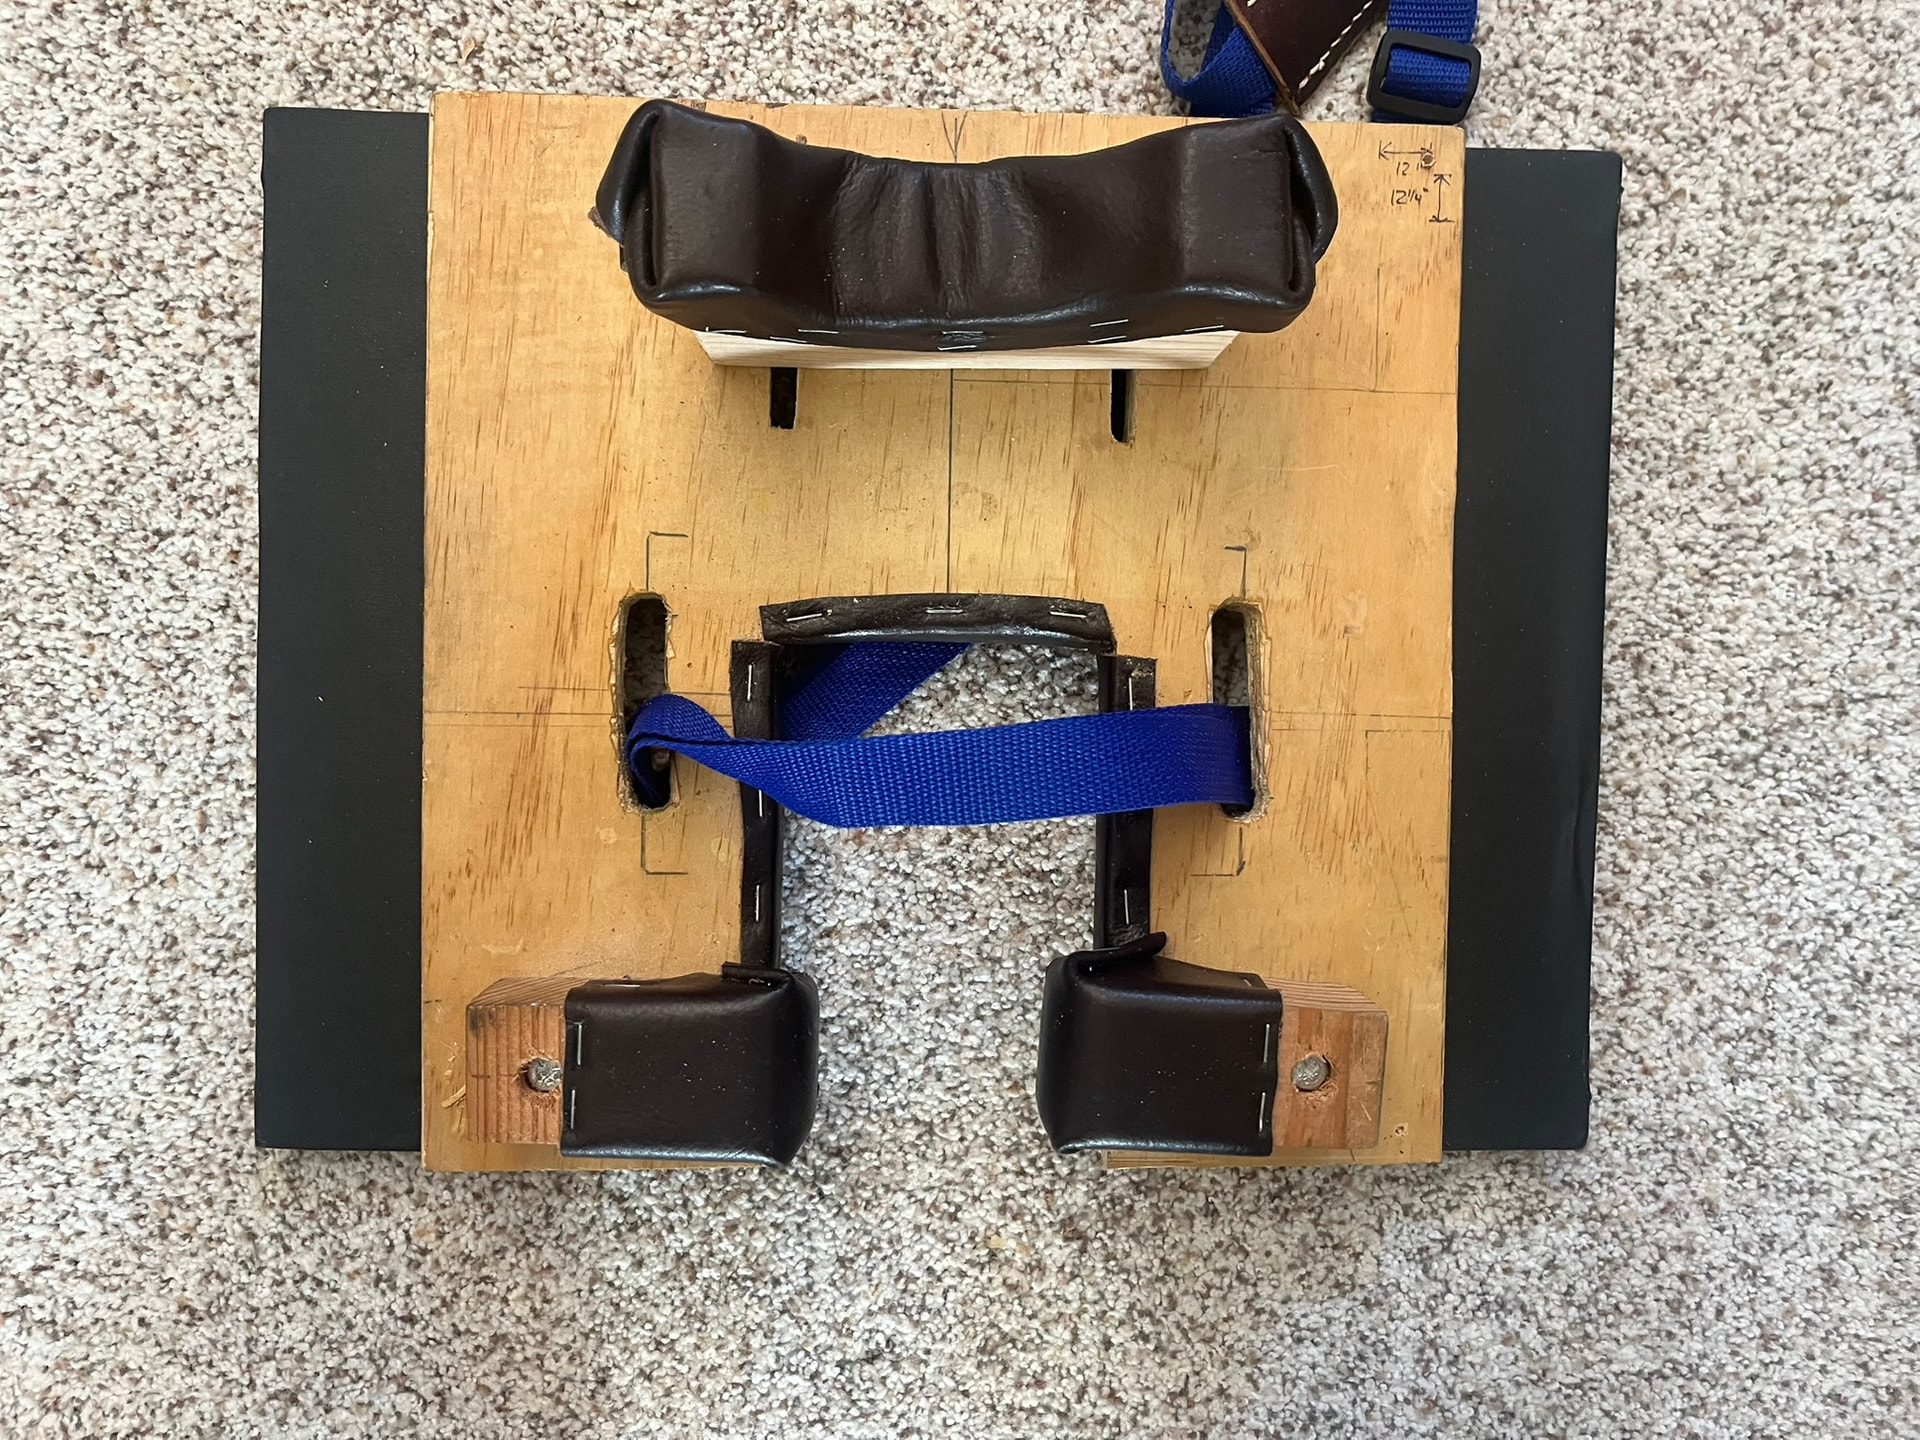
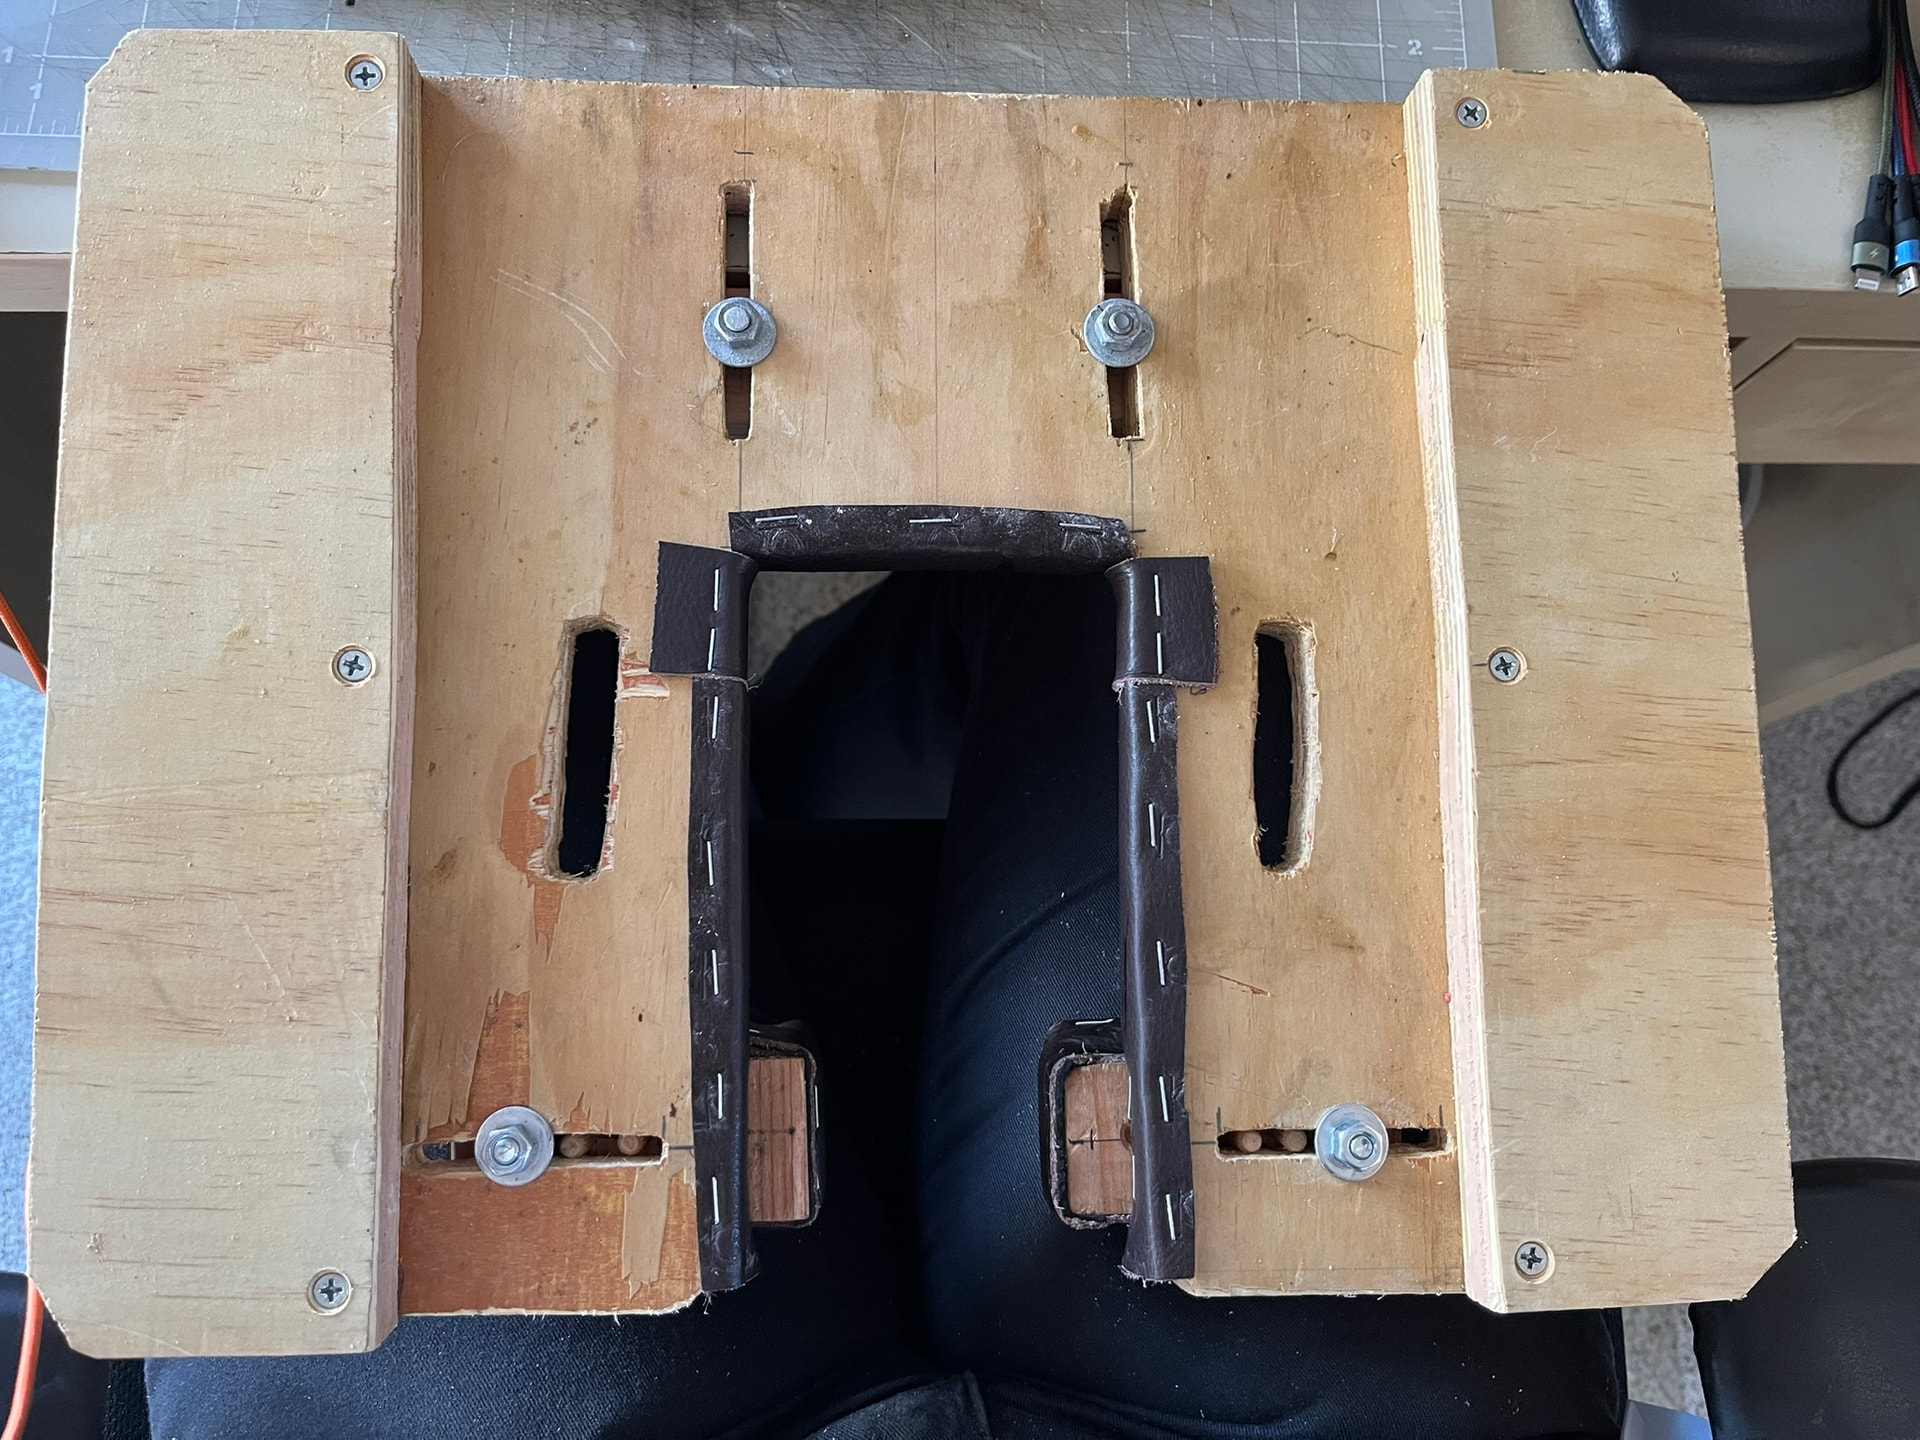
@thenewreligion shared a few Instagram posts from yoshiken_shoemaking featuring a lap board with a slot cut out of the middle to allow the tops of boots to pass under. That inspired me to pull a lap board I’d made out of my junk pile and rework it with a slot and adjustable heel rests and toe cradle:


I’d previously built a lap board for shoes, without any cutout, for rewelting dress shoes. But I’d largely abandoned it, since all my original pairs and more recent repairs have been boots. I never thought about just cutting a big slot for the tops.
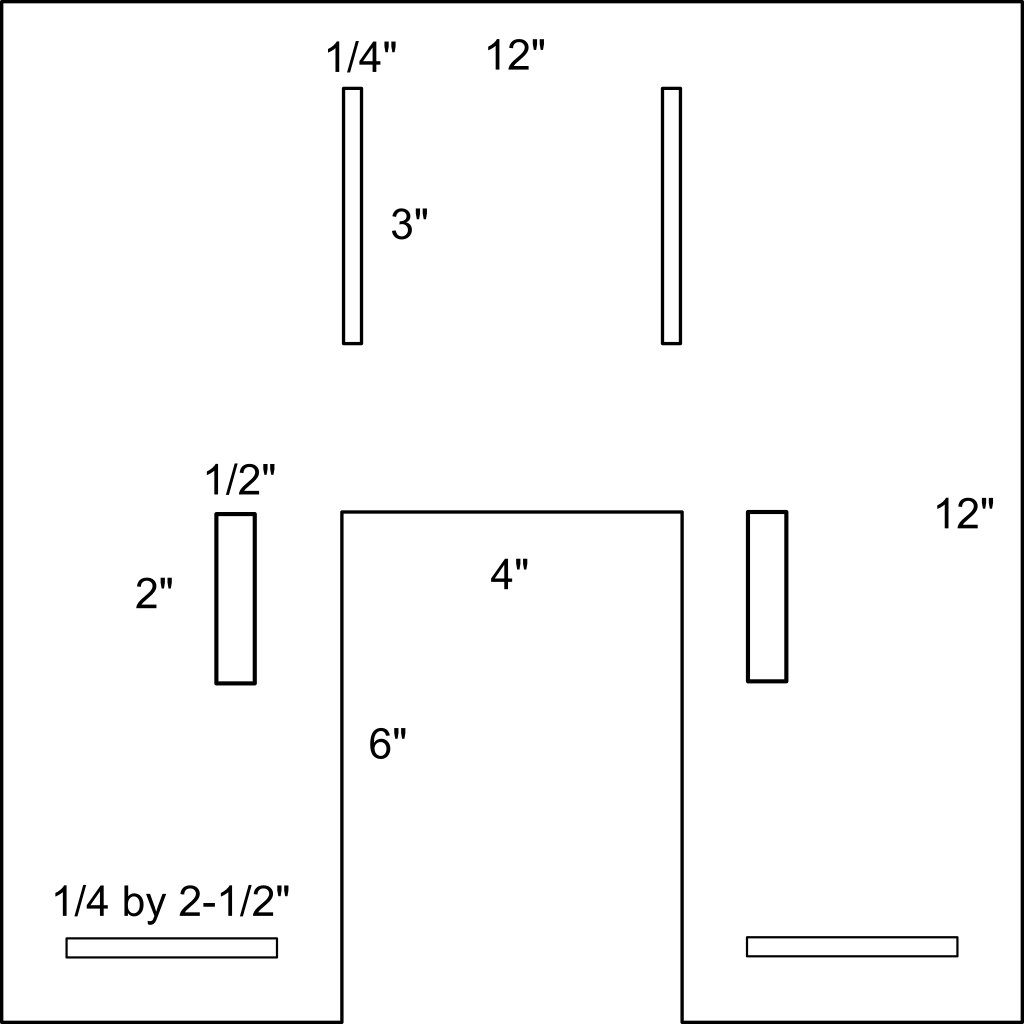
Construction

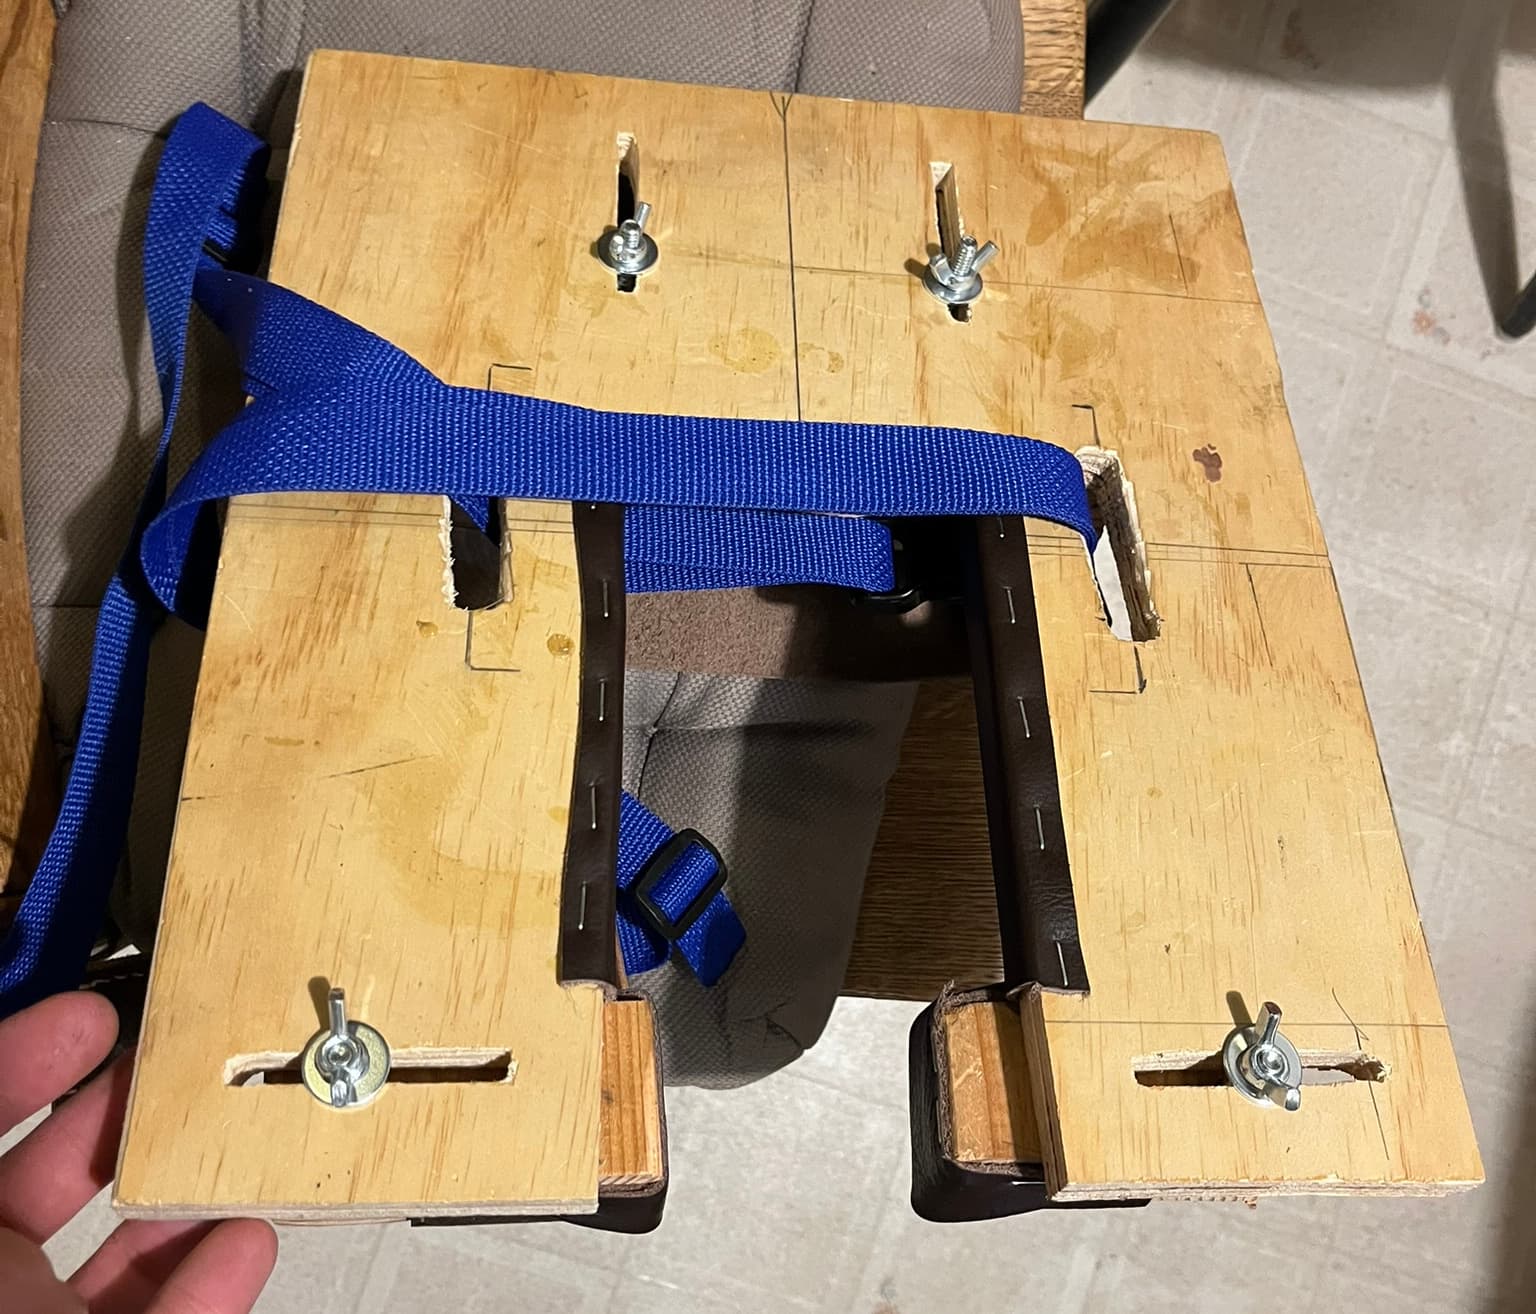
The core is a piece of plywood. The fixtures are from scrap 2x4s and a little hardwood board. The leather is no-name, chrome-tan pigskin from my scrap bin—the first thing I saw that seemed like enough and wouldn’t transfer color or lots of oils to the work. I fixed the leather to the fixtures with a light-duty staple gun. I don’t remember exactly, but I think the hardware is 10-24: one bolt, one washer, and one wingnut per slot.

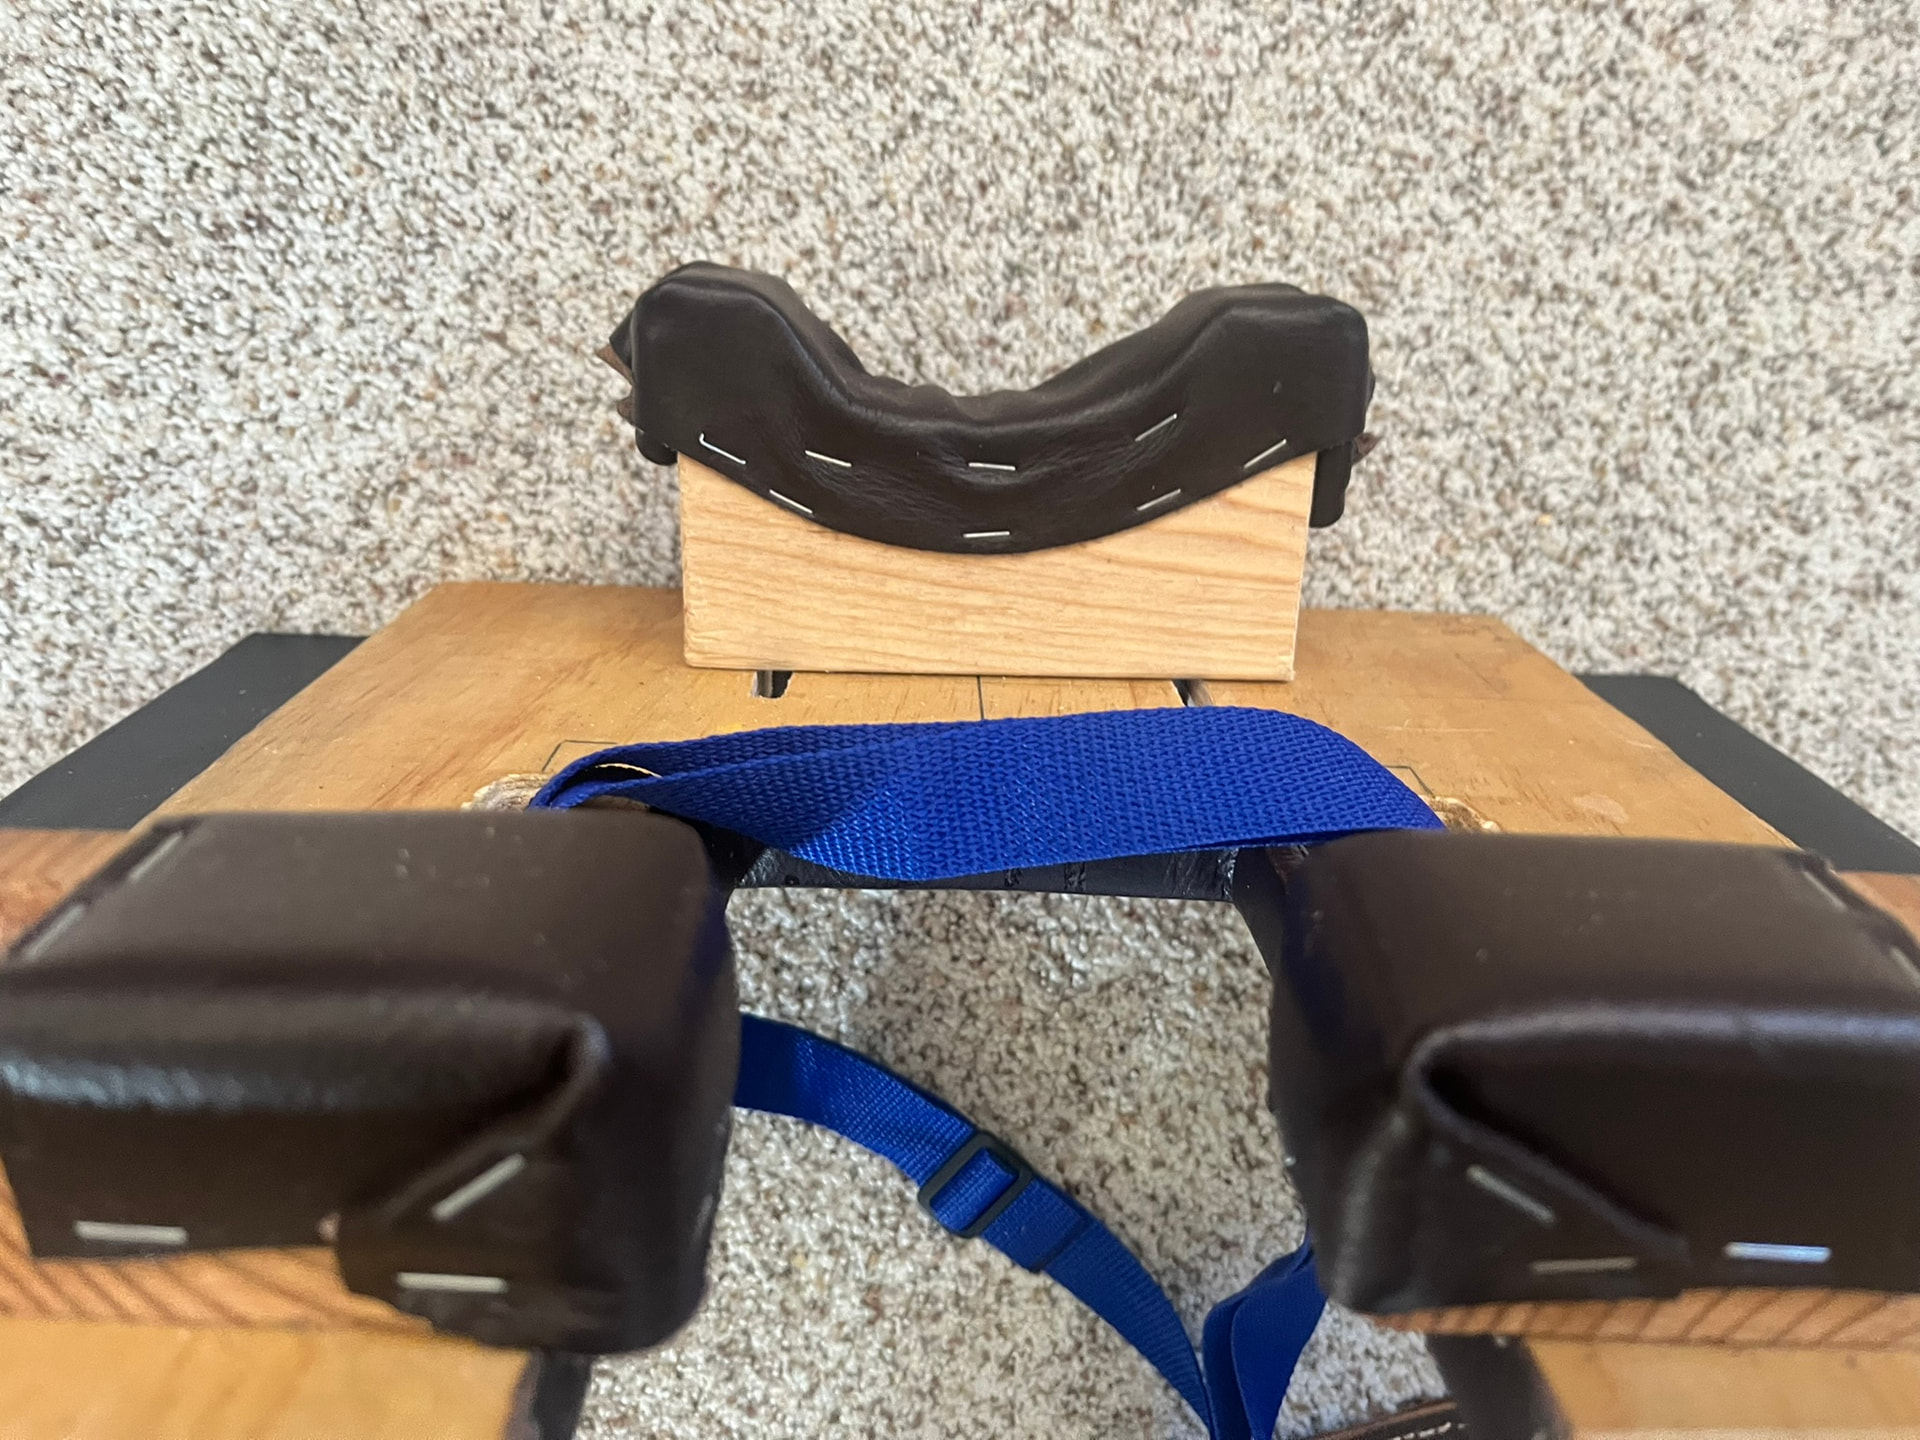
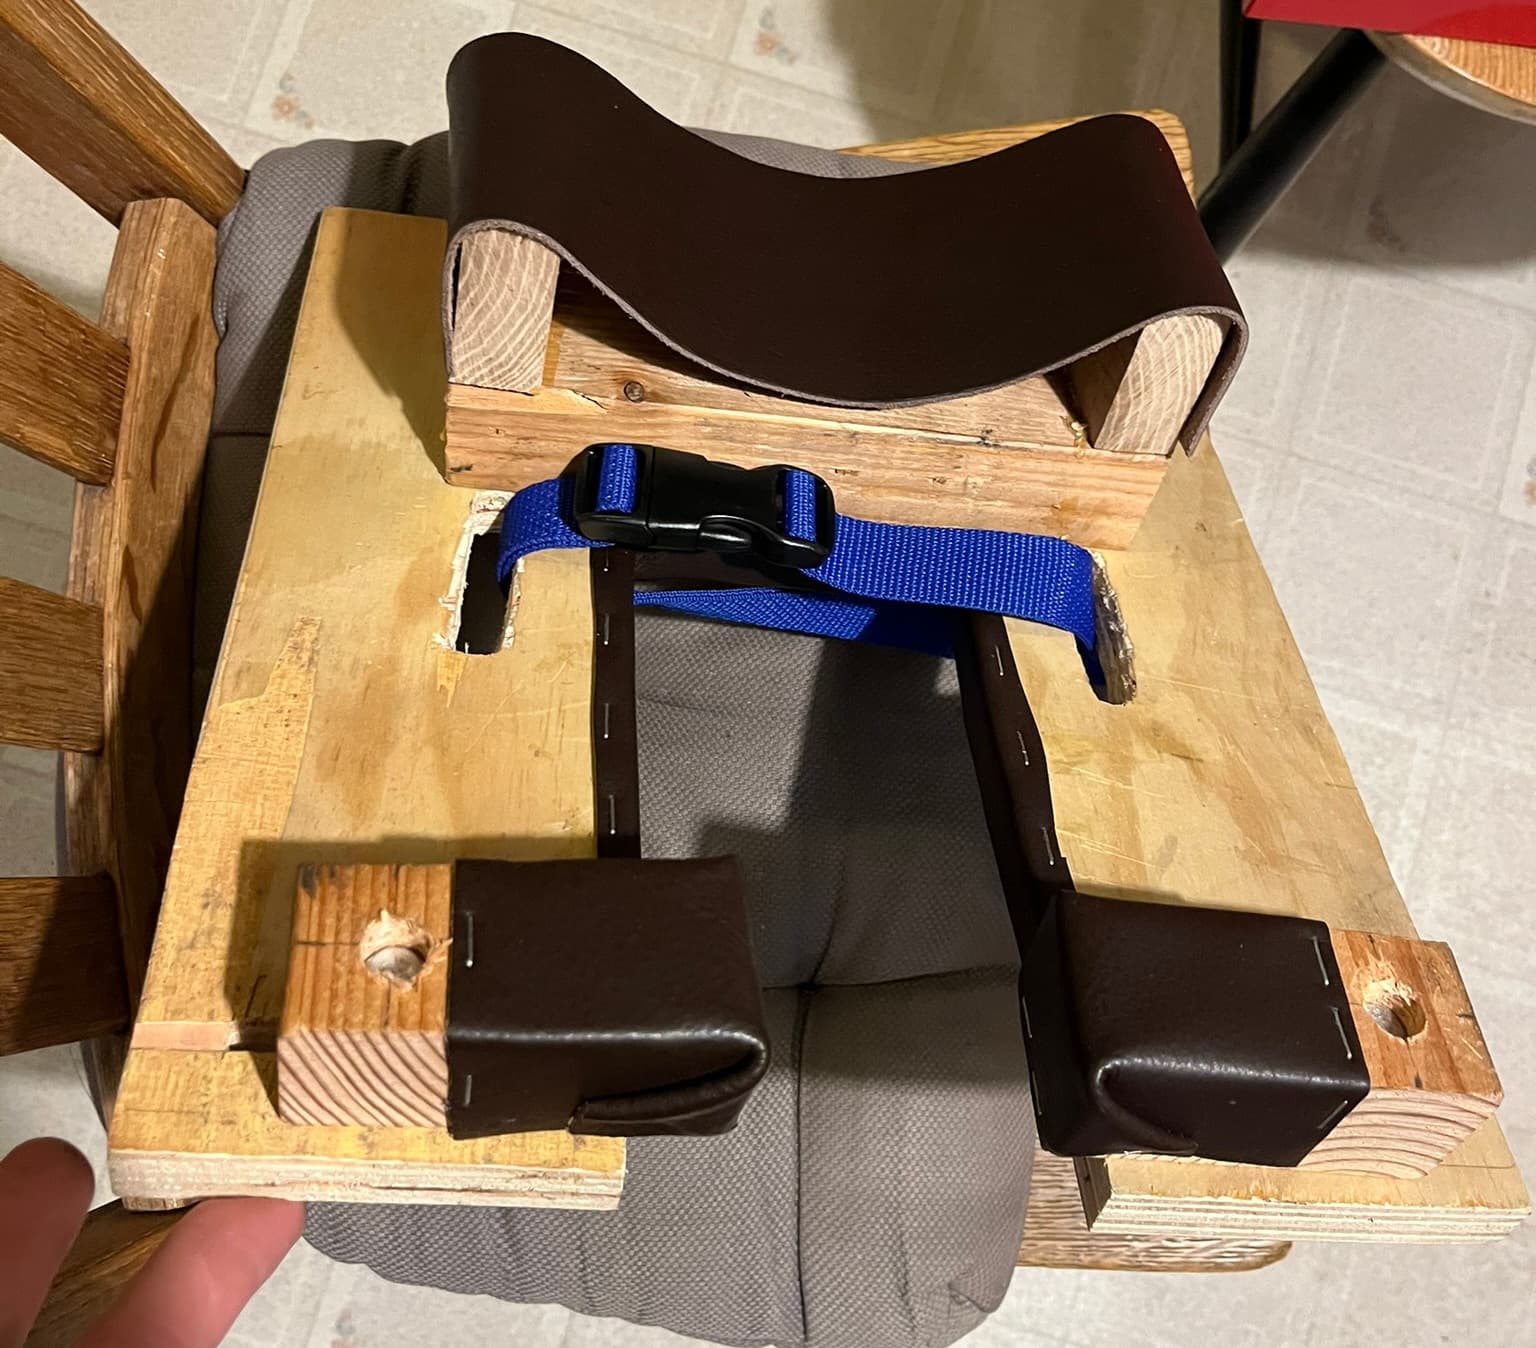
The toe cradle is the same quick-and-dirty design that I used for my repair setup in the garage: two blocks of wood stood upright, their inside edges beveled, with a strap of leather suspended across like a hammock. The trick is to pull the leather high enough so that it doesn’t bottom out on the wood under weight and pressure of the shoe. Also to cut the leather to leave some slack, expecting to restaple a couple times to get it adjusted right.

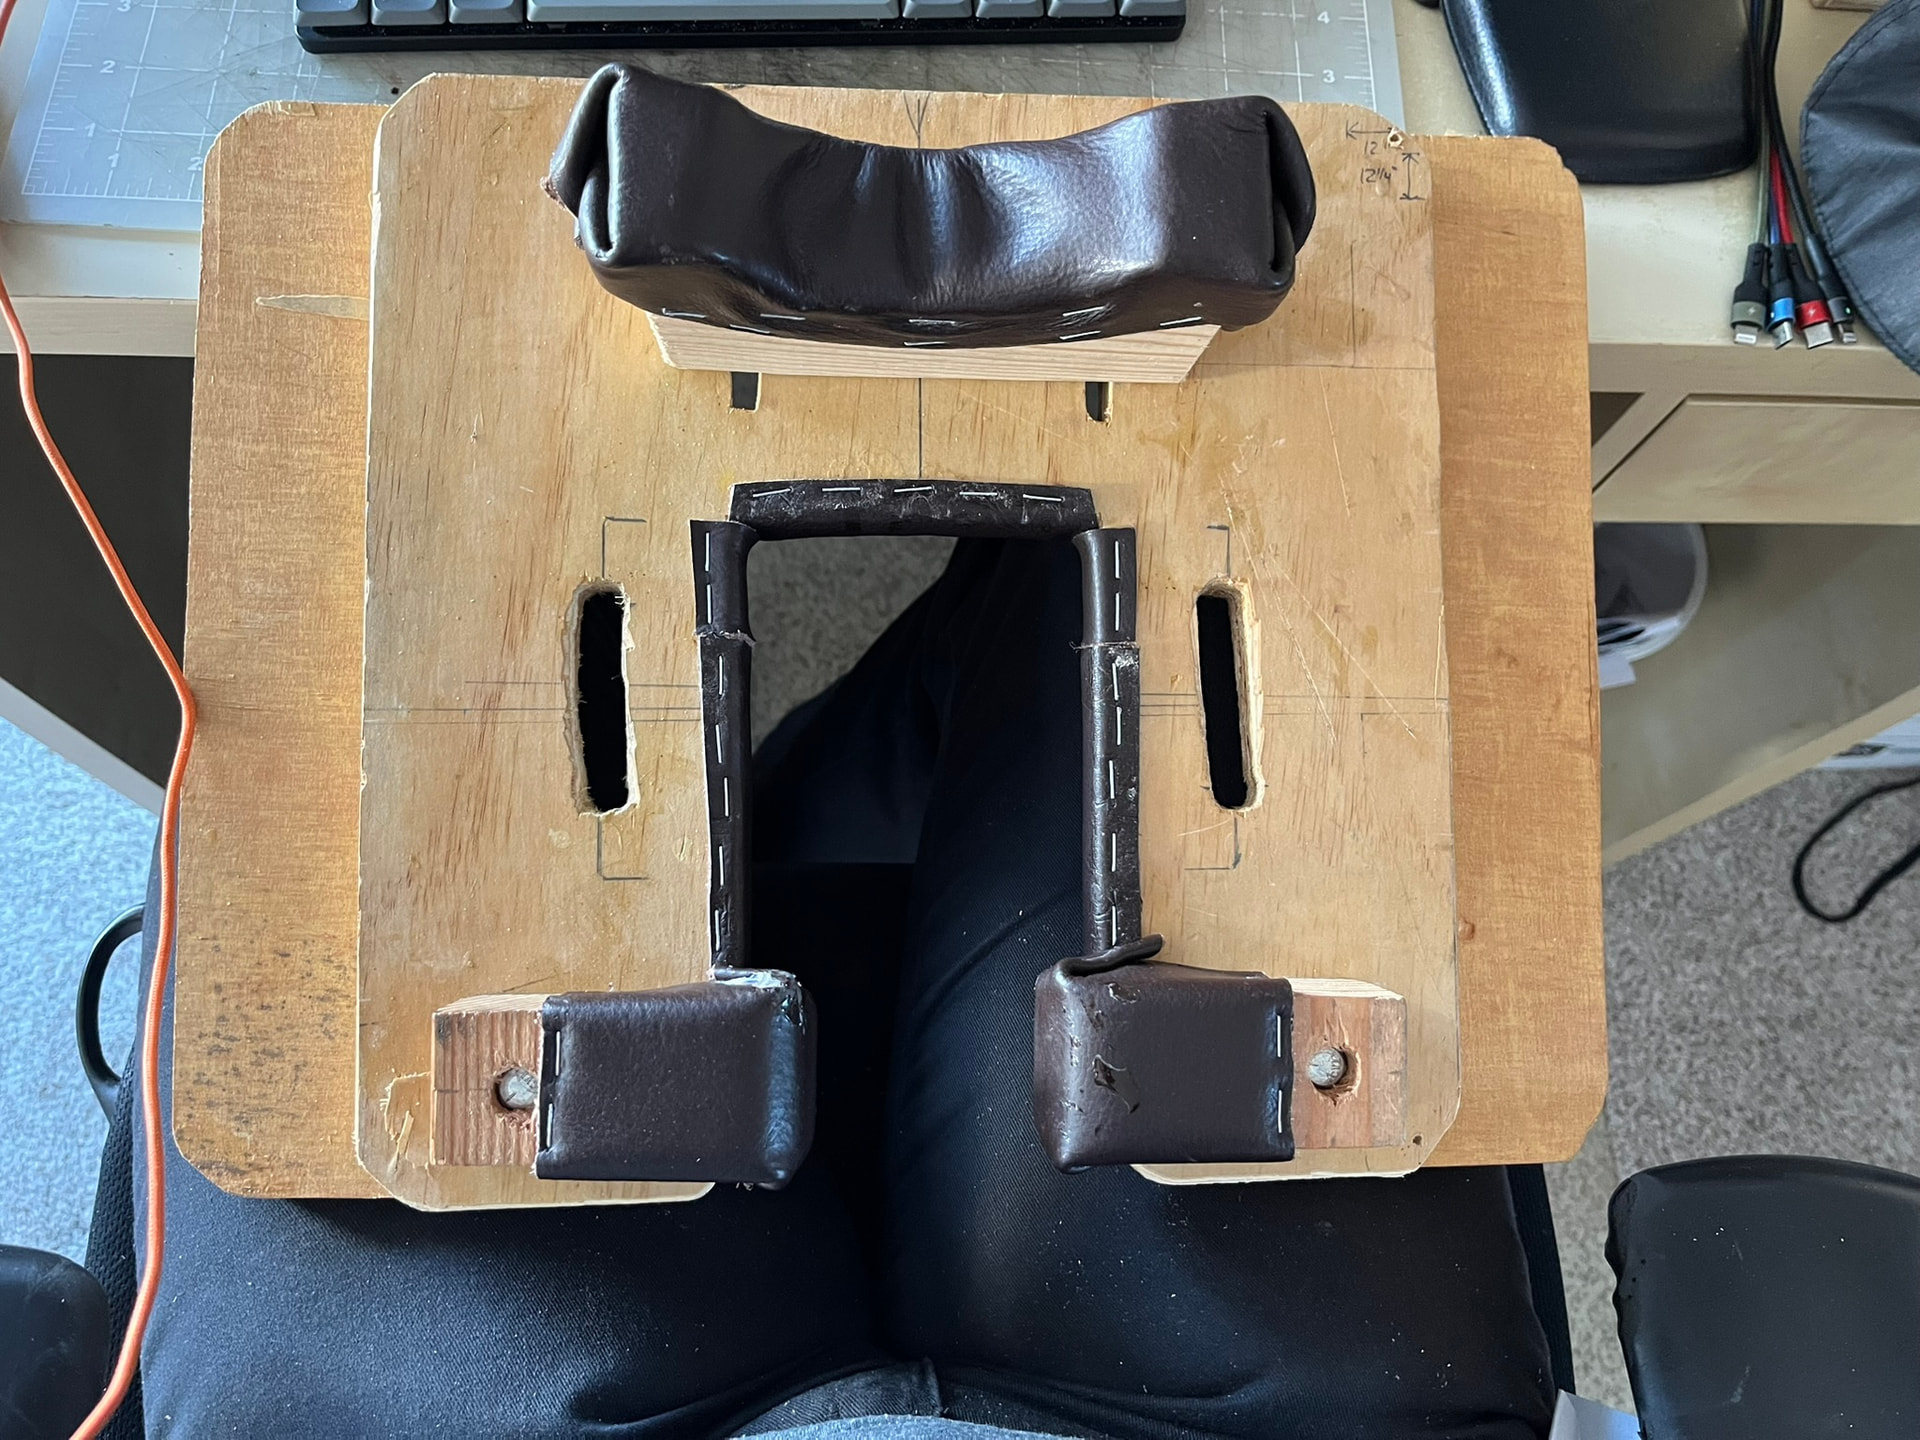
The top slot here is 4" wide, which is wider than necessary. I wanted to avoid marring as much as I could, and also realized that the width didn’t matter so much if I can slide the adjustable heel rests closer.

Mistake: Distance from heel rests to toe cradle.

As it stands, the tops of the heel rests are about 6 inches from the bottom of the toe rest when the toe rest is slid down to its lower position. That’s still a bit long.

I’ll likely cut new slots for the heel rests two inches or more further up, closer to the toe cradle.

I misjudged this building the stand I use for repair in the garage, too.

Mistake: I’d like it even wider.

The lap board Yoshi uses in his posts is much narrower than this one, but I find I like a wider board, to get better bearing on my legs without holding them inward.

The board I made is 12 inches wide, because I wanted it to fit in one of the milk crates I use to store my shoe supplies. I’d like another two inches or so on each side.

Mistake: Just one bolt through each heel rest.

I can already tell that the heel rests are going to want to rotate around their bolts. If I made the rests longer and put two bolts through them, they’d take more time to adjust, but wouldn’t rotate. I suppose I could also go in there and glue a dowel or strip of wood to the bottoms for a similar effect.

Fine: Wingnuts on Bottom

I worried about having exposed wingnuts on the bottom of the board, since they could bump into my legs and knees. But it doesn’t seem like it’s going to be a problem.

1 Like

Improved the heel rests.

I’ve added one 1/4-inch dowel to the bottom of each heel rest, about 1" from the bolt used to clamp it in place.

I first clamped the heel rests to the board as far outward as the would go, making sure they were aligned perpendicular to the long axis of the board. Then I used a deep-hole marker through the track in the lap board to mark the line of travel on the bottom of each heel rest. I drilled a 1/4-inch hole on each of those tracks, 1 inch from the bolt, and glued in a dowel.

There’s still a bit of rotating plan in each of the heel rests, but they no longer spin around freely relative to the lap board.

Moved the heel rest tracks closer.

I cut new sliding tracks for the heel rests 2 inches closer to the toe cradle. That worked so much better that I just trimmed away the bottom of the board, with the old tracks.

The resulting layout is roughly:

1 Like

Improvement: Use simple nuts and file the screws flush.

I replaced the wingnuts holding the toe cradle and heel stops to the board with simple nuts. Once they were tightened in place, I marked the bolts for length at the tops of the bolts, cut them off with a hacksaw, then filed them flush.

The nuts still stick out a bit from the bottom. I don’t think I have enough thickness in the plywood to countersink them. But having bolts rather than wingnuts under there makes the board much more comfortable to use, especially when applying good pressure with the foot strap. I can also rotate the board in my lap at all angles, without worrying about driving a wingnut into the top of a thigh.

Improvement: Wider

I attached some wings to the left and right sides, widening the board to about 16 inches in total. This made it possible to use securely with my legs spread a little further apart, which I find more comfortable.

Unintentionally, this also raised the working surface to a more comfortable height. My forearms are now pretty much level when working over the bottom of a last now.

Digging the nuts and bolts into my legs is even less an issue now. And I find it’s still possible to rotate the board in my lap comfortably.

Improvement: Solid Toe Cradle

I’ve replaced the leather-hammock toe cradle with a scalloped wood one.

The leather hammock was great for avoid marring on the upper, but didn’t hold shoes quite as still as I’d like. They could still rotate slightly from side to side, within the swing of the leather.

On the other hand, I think I did well making the toe cradle parts separately and attaching them with screws. The sliding slots allow me to adjust to the length of the last. I’m also continuing to experiment with toe cradle shapes, which is easy to do when I can just swap the cradles out.

Open Question: What’s the best shape for a toe cradle?

A good toe cradle should keep shoes still and not mar their uppers. I’m clear on that, but not on how best to about it.

Some toe cradles are essentially two-dimensional scalloped curves. That’s how Julian does them on the boards he sells, for example:

Ditto Terry Kim’s board, which has a post for lasts with thimbles, rather than mounts to hold the backpart:

And Ken Hishinuma’s:

Others are more three-dimensional, essentially negatives of typical toe boxes:

Improvement: Longer boot slot.

I was worried lengthening the slot might leave too little material across the forepart area to keep the whole thing from twisting, but it seems to remain stiff enough.

Improvement: Rounded corners.

I found my threads getting caught on the various sharp corners, so I cut them at 45 degrees and rounded over the edges with a rasp.

Improvement: More dowels for heel rest stability.

I originally I held on each heel rest with just one bolt and one dowel rod a half inch away. That mostly kept them straight, but allowed a little bit of wiggling rotation. Adding dowel rods a full inch away from the bolt holes has cut that wiggling down.